Here is the promised tutorial, specific to this block. If you have never paper pieced before, it takes a bit before the "a-ha!" moment comes, because you might feel like you are working backwards or upside-down... you'll see what I mean. The only way to get it is to try it. There are some other great tutorials out there on paper piecing in general, including a good one that Terri pointed out at The Sometimes Crafter.
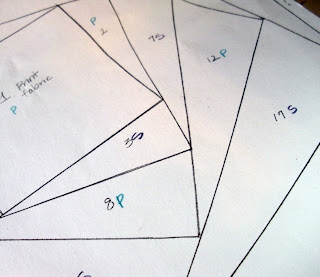
This is my foundation pattern:
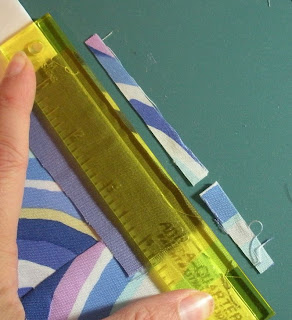
You don’t need any special equipment for paper-piecing, but I do use one nifty tool to trim my seam allowances, the Add-A-Quarter ruler by CM Designs:
The first thing I do when creating a block using a paper foundation is to orient myself with where each fabric is going to go. In this case, I did that by marking the numbers with a "P" for print or an "S" for solid. You can also use a color to denote each fabric, that works well, too.
1. My foundation block is copied onto regular 20 wt. Xerox paper, so you will want to set your sewing machine to a shorter stitch length to make the paper easier to remove. (You DO NOT need to tear the paper off, I will do that!) I set my Janome at 1.5; it’s a tiny stitch.
**There are some great foundation papers available on the market, I like the one sold under Carol Doak’s name. I just didn’t have any on hand when I prepared these.
2. With the printed side of your pattern face down, lay your first piece of fabric over the shape labeled “1”, face up. This is your center square. You always want to make sure you have enough fabric to cover your desired space, a seam allowance, as well as a little extra wiggle room. (I used all squares and rectangles to piece my block).
3. Place a print rectangle big enough to cover space #2, face down on top of the center square, piece “1”. Hold your paper up to the light, or use a light box, to make sure your fabrics will cover space 1 & 2 while allowing some extra for a seam allowance. Note that #2 fabric is in place of where it will be when you sew the seam, just like it is when you piece normally, not in the place where it will be when you press it open to reveal it's right side.
** I recommend pinning in place, at least the first time around
4. Your first seam will be stitched ON THE LINE between space 1 and space 2. Stitch from just before the first intersection on the line (start of the line), to just beyond the end of that line.
5. Turn you block over face down, and fold the paper back along your seam line. Using a ruler or your Add-A-Quarter ruler, trim to your seam allowance. It is not necessary that it be precisely 1/4", close is good enough.
6. Turn paper over and press seam open.
7. To find your stitch line (necessary since we are using Xerox paper and not transluscent foundation paper), fold the paper and fabric along the seam line between the pieces you have just attached and piece #3. Crease with your fingernail or a stiletto. It will show your seam mark like this:
You can also use a seam roller/presser to reinforce your seam mark.
8. Now lay your next piece of fabric (a solid) right side down, overlapping the crease mark by roughly ¼” to leave a seam allowance. Carefully flip your foundation and fabric over, stitch on seam line for piece #3.
9. Repeat step 5 to trim your excess fabric to the proper seam allowance.
10. Repeat the same process for attaching fabric 4, 5, 6 and so on.
A Few Notes:
**I stop and press every seam open (without steam) to avoid getting “ripples” or "puckers" as I add pieces to my block.
**Sometimes, I will trim a piece before I sew it down. I use the same method of folding back and finger pressing and then cut a roughly 1/4” seam line.
**Remember you are always going to stitch exactly ON your line:
**Your stitch line only needs to extend slightly beyond the ends of the drawn or printed line:
When you get to the edge pieces, stitch through the seam allowance, just past the edge of your paper foundation:
10. Once all your pieces are attached, your foundation block will look like this:
11. Trim your block to size (including the ¼” seam allowance) to get your finished block:
Hopefully this makes sense, I've written and edited patterns and instructions for years, but this is the first time I have attempted teaching something so visual via written instructions! Any seasoned paper piecers reading this, please feel free to clarify my words and tips in the comments...
And email me if you just can't get it!


This tutorial is going to be very helpful for me, since I've never tried paper piecing. I did find another helpful tutorial on The Sometimes Crafter, but I think I'll use yours to guide me through this block. Thanks for posting it!
ReplyDeleteGreat! Since you've just put out this great tutorial, then I'm not late! These summer months are sweeping by, but my OBO package is next in line on my worktable. Thanks for all the photos and instructions.
ReplyDeleteYou knew I was praying for this tutorial....didn't you? I have been busy with kids' soccer and just checked our blog...PRESTO! Like magic, you posted just what I was hoping to find. Thanks, I'll get to work on it very, very soon. ;o)
ReplyDeleteHey Doris! I just got back from being out of town and will get to work on your block ASAP! Thanks for the tutorial!
ReplyDeleteI love the block but would like to know where you got the foundation pattern? Do you have it available as a pdf? Thanks!
ReplyDeleteThis is a GREAT tutorial! You really helped me understand and visualize the process than any other tutorial I have seen for it. Thanks!
ReplyDeleteThis tutorial is very helpful for understanding how to get started with paper piecing.
ReplyDelete